Showing posts with label Bike Care. Show all posts

Wednesday, July 31, 2013

SRAM XX1 Chainring | Deconstructing how it works.

By now, you may have heard SRAM XX1; and while this actually refers to a whole line-up of SRAM components, most, if not all the buzz about XX1 is revolving about the concept of using a single chain ring drivetrain on the cranks. 


More to the point, the XX1 chain ring has been developed so that chainsuck* is all but a thing of the past.   

SRAM went back to the drawing board on the new chain ring design and uses very precise "cut" steps to alternate thickness on every other chain ring tooth, creating a well-matched interface between each inner and outer plate of the chain itself.   

This creates a "hugging" action between the chain and chain ring which helps to keep the chain in place.   If you look more closely, the teeth are also taller than normal, to also help in the event the chain does become a little slack. 


KING OF THE RING

Developed for maximum chain control, each tooth’s thickness is precisely CNC-machined to support the chain’s inner and outer links perfectly. Six available chain rings (28-30-32-34-36-38) allow you to tune your gear range to match your terrain, wheel size and riding style. Each X-SYNC™ chain ring fits a single, universal spider—allowing you to change rings without removing the light-weight carbon crank arm.
  • New tooth profile alternates thickness by inner and outer links, providing maximum chain control
  • Carbon arms with forged aluminum spider
  • CNC-machined rings (28-30-32-34-36-38)
  • New spider design allows for easier ring changes
  • Wide/narrow Q factor cranks for BB30 and GXP
  • Weight: 650 grams with BB
The reports on SRAM's XX1 chain ring set-up have been more than favorable! Over and over again folks have been able to enjoy their favorite rough terrain runs knowing that their chain will be staying put.  As of the time of this write-up, we haven't yet had any personal experience with the system, but it has peaked our interest and after some research, it know on our radar.

What did people do before SRAM XX1? 
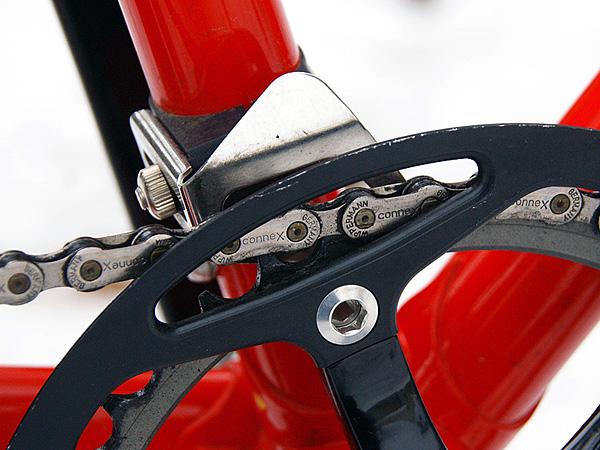
For years the mountain bike community has been dealing with chainsuck by adding gadgets to retain the chain from moving off the chain rings.  IE: chainguides, N-JumpStops, etc. 

Alternatives to SRAM XX1?

Well, yes there are some alternatives, some companies like RaceFace  are now joining the party with their own versions of the "no-jump" chainring; but mostly, the main alternative is still in the form of the guides and stops linked above.  

"*Chainsuck is defined as the moment your chain looses enough tension to physically jumps/drops off the crank chain rings; sometimes this means it falls to the gear below it,  while other times it may jump off to the outside or inside of the chain ring landing on the frame or crank arms."

Have questions, comments, or better intel?  Let us know!

Friday, May 3, 2013

Fixing your chain

If you ride a bike, it's pretty much a must to know how to fix your bike's chain, because it will inevitably fail at some point; more times than not at the furthest distance from where you need to be!

Fixing a chain usually requires  removing the damaged links and putting it back into working order by installing a "quick" link or link-pin, which creates the seamless chain loop.

In order to fix the chain, you'll likely need a tool called a "chain-breaker," don't worry, it's also a chain fixer! (Park Chain Tool: right)

When a chain breaks in two, it usually will look a little like the photo to the upper left corner.

To keep this article from getting too complicated, a basic understanding of what makes up a chain is this; a chain has four basic parts, inner-links which are 2 plates that as spaced apart with rollers, and outer-links that hold together inner-links by sandwiching them between 2 plates that are held together with pressed-in pins.  1 set of inner and outer links mated by pin = 1 full link.

When a chain breaks, like in the above photo, the outer plates usually cracks or gives way where the pin is pressed in; which allows the outer plates to peel apart / chain to split.

Depending on whether you are using a Quick-link or a link-pin for the chain repair, makes a difference about what steps you need to take next.  Either way, you will need to do is remove the broken sections of the chain using a chain-tool (below right pic) by "de-pinning" the broken sections until they fall apart, leaving only the desired chain.

Take a look at the photo on the left, you'll see 3 items, in the middle and left, are a pair of half-links (outer plates and two pre-installed pins), also known as a Quick-link, the item on the right is a link / press-pin.

Link/Press-Pin Installation:   To install the traditional press-pin, you'll need to get the chain to a point where you have a pair of good outer-plates and a pair of good inner-plates that can be mated by  inserting a press-pin.


Quick-Link Installation:
 Unlike the link-pin fix, the idea behind the a Quick-Link is simple.  Remove the broken outer-plates to the point that you have a pair of inner-links at end of the chain;  once at this point, install quick link by slipping each half-link (pin side in) through the open holes in the inner-links until each half-link pin groove meets the other.  Now grab the chain on each side of the fix point and pulled length wise; you should hear a "snap" as the plates and pins lock together. (Photo right: quick-link in locked position)


People will argue to the end of time which system in better, and I myself have used both and see the potential in each system, but we can save that discussion for it's own post in the future.

Side Notes: No matter which "fix" you decide on, make sure that you are using the correct size for your application!  Chains differ in size and based on number of gears and brand.  So you must make sure that your "fix" is for SRAM, Shimano, Campy, Single-speed, 7,8,9,10 or even 11 speed compatible and everything in between!

Installation Notes Expanded: 
Quick-Link Installation NOTES: Quick-links have oval looking holes which are really two holes side-by-side, the inner most hole is what the pin head initially fits through by aligning both sets of inner plates, one side of the power link from the back side of the chain, one side of the power link through the front side of the chain, bring together and connect the pins and plates on the inner most hole making sure the front and backside pins  are through the plates.  Now just pull the chain backwards to slide and set the pins in the holes furthest out. You should feel a "click."


Thursday, February 28, 2013

Brakes | Traditional Cantilever vs Direct-pull


Brakes | Traditional Cantilever vs Direct-pull  

This topic is not to argue which one is better or pro's & con's of either system, but rather to simply point out the differences between the two systems which becomes critical when shopping for replacement brake shoes or even replacement brakes.  
Traditional, cantilever brakes used two cables in tandem to create the brake force; a main cable running from the lever and bike, to a second, "transverse" cable which connects both arms of the cantilever units, one on each side of the wheel.  As the main cable lifts/pulls upward on the middle of the transverse cable, causing the cantilever arms to rotate inward, applying pressure on the rims to slow the bike.
"Direct pull" brakes, while also a type of cantilever, are also commonly known as "V-Brakes" (a Shimano trademark).  V-Brakes offer a cleaner design by using only a single cable from the brake levers to you brake arms.  So unlike the canti-brakes that use a cable-cable-arm system, V-Brakes offer a cable-to-brake are system, hence "Direct-pull" and as you squeeze the brake lever, the cable initially pulls the right-side arm until it meets the rim and then the left arm is pulled inward to the rim, together squeezing against the wheel to slow you down.

While those are the basic variances in the two systems, both systems use levers on the handlebars, cables and cable housing to protect both the frame and cable from rubbing, as well are mechanical arms that pivot from the frame to push against a rim that provides friction to slow the bike down. 
This is a very simplistic article as there are many, many complicated designs of each system on the market, some include hydraulic-lines in place of cables, multi-pivot designs to offer maximum braking force, weight savings and more... 

Note: Often important to note which brakes you own, at least by brand name and by the type of pads installed for when you need replacement parts. Your local bikes shops are usually pretty friendly, so you can always bring the bike to them so they can see in person what you own, or make is simple, just snap a photo with the old cell-phone. 


Tuesday, January 8, 2013

A Few Good Reasons To Upgrade Your Wheels

A Few Good Reasons To Upgrade Your Wheels 

Whether you are talking about road, cross-country, downhill, commuter, or BMX bikes, the reason for a good pair of wheels remains the same.


Stock wheels are often there to "get you by" and are far too often left inadequate even on higher-end
bikes when all the other components are absolutely top-notch!   Don't get me wrong, many bikes come equipped with wheelsets that work well enough that you may never find a need to change them.  This article is simply to point out a few reasons to consider an upgrade.  

Let's look at a few of the more common issues with stock and inexpensive wheels.   First, even if the wheelset itself is strong, the likely downside is the weight of the components that make up the wheel itself.  A wheel is made up of 3 main parts:

  1. Hub: Center component that holds your cassette which is held center by one end of the spokes.
  2. Spokes: Spoke and spoke nipples are the interface between the hub and rim.  They also give the wheel most of its strength (through tension).
  3. Rim: Outer most part of the wheel that is connected via spokes. This part of the wheel is often where the "integrity" of the wheel comes from and makes up a majority of the weight.

Wheel technology is ever changing and much faster than we can keep up with.  We often think of wheels in 3 ways: cost, strength, and weight.   There are far too many reasons as to the how's and why's of wheel components in terms of weight, strength, etc.; but to keep it short we'll just say that it is all through design and materials.

Most folks look at a wheel and see a round object, but wheels really are a marvel of engineering.  Even if they are only made with "fair" or "mediocre" components, they can be remarkably strong and exceptionally well suited to cycling.

One of the cost cutting areas where manufacturers save money is building a wheel via machine instead of a good hand-build. While machines can do many things well, none can build a wheel like a person with the know-how.  Truing and tensioning a wheel is a delicate process and could be compared to tuning a string instrument. 

So what should you look for in a wheel and how can new wheels benefit you? 

Ride Quality: Wheels are the primary contact point to the ground; they have a lot to do with how the ride feels as it moves over terrain, during braking, and acceleration.  For example, a BMX wheel is made to withstand the short and stout with usually 2x as many spokes as a road or mountain bike wheel.  This is to help it resist flex and withstand large impacts.  Typically, ride quality is measured in compliance and comfort.

- Reliability: As touched on above, wheel reliability will stem from various parts that come together to form a system that works in harmony; the wheel. There are no silver bullets for wheels, meaning no one wheel will work 100% in all circumstances.  Choosing a wheel that fits your needs is usually more important then the cost.   A wheel for commuting, for example, should not only be strong, but should be picked with the mindset of low maintenance, and while you may want a light wheel set for commuting, it is not a "must" have as it would be if you were racing. 


- Pedaling: Best place to begin is with inertia; not familiar with it? It's easy:  Inertia is the resistance of any physical object to a change in its state of motion or rest. In other words, a wheel ability to accelerate or stop is directly related to it's weight. On a bike,  inertia also effects the way a bike reacts to steering. Typically speaking, less weight means more efficient use of energy, but usually at the loss of strength or much higher costs.

Wheels are argueably the hardest working components on your bike!  They absorb the forces that your tires don't, they flex when your frame doesn't and they take all the stresses from your acceleration and braking.  It's precisely these reasons why it's so important to spend the time and money on finding the proper wheels for your bike. Spending your money wisely on a pair of quality "purpose" built wheels will help to ensure they'll keep your world spinning for years to come.

 Tip: Create a checklist before you look for that next wheelset:

  • Rider Weight
  • Purpose:
    • Discipline: Mountain, Road, Commuting, BMX, etc.
    • Racing, Stunts, Jumping, Light Weight, Maintenance 
  • Type of Brakes 
    • Rim, Disc, or both?
  • Type of Rim
    • Clincher (Tubed), Tubeless, Tubular (Glue-on)
    • Material: Carbon, Aluminum, etc.
  • Write down a paragraph or two about your intent and goals for the new wheels.
  • Budget
  • List of Quality known wheel builders
Don't be shy to call bike shops, ask friends, even someone you meet in public that might have a wheel that catches your eye.  How do they like it? Who build it? Cost? What has the maintenance been like? Cost of broken or replacement parts? How long have you owned them?  Miles on them?